
Keeping your contact information organized is crucial in today’s digital world. Exporting contacts proves useful whether you’re switching email providers or backing up data. This guide shows you how to export contacts from both Outlook for Windows and Outlook.com.
Exporting Contacts from Outlook for Windows (Classic Outlook)
The export process varies slightly depending on your Outlook version. Here’s how to export contacts using the classic version with the “File” menu:
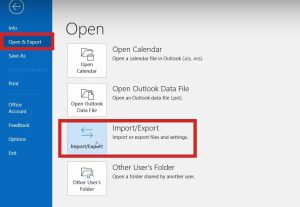
- Launch Outlook on your computer. Click “File” in the top left corner. In the “File” menu, find “Open & Export.” Then click “Import/Export” to open a new window.
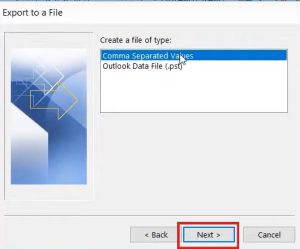
- In the “Open & Export” window, select “Export to a file.” Click “Next” to proceed. Choose “Comma Separated Values” (CSV) as the file format. Click “Next” to continue.
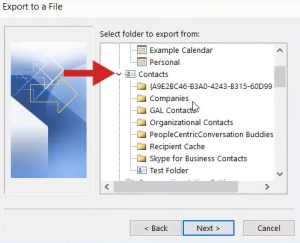
- Ensure “Contacts” is selected under the “Select folder to export from” section. You can also choose a specific contact folder. Click “Next” to proceed.
- Click “Browse” to select where to save the file. Choose a location and name the file, e.g., “My Outlook Contacts.” Click “OK” to confirm.
- Click “Finish” to start the export process. Outlook will save your contacts as a CSV file in the specified location.
Exporting Contacts from Outlook for Windows (New Outlook)
Are you using a newer Outlook version? The ribbon interface changes the export process slightly:
- Launch Outlook and find the navigation bar on the left side. Click the “People” icon in the navigation bar to open the contacts section.
- On the “Home” tab, click “Manage contacts,” then select “Export contacts” from the dropdown menu. A new window “Contacts from this folder” will ask if you want to export “All contacts” or a “specific folder.” Pick your option.
- Click “Export” to start. Choose a location and name for your CSV file. Confirm with “OK”.
Exporting Contacts from Outlook.com (Web Version)
Exporting contacts from Outlook.com is simple. Follow these steps to master the process:
- Access your account via a web browser. Enter your Microsoft account credentials. Click the “People” icon in the navigation bar on the left side.
- On the toolbar, click “Manage contacts.” Choose “Export contacts” from the submenu. A confirmation window appears. Select to export all contacts or just a specific group.
- Click “Export.” Contacts will automatically save as “contacts.csv” in your Downloads folder.

Hi there! I’m John R. Steadman, if you want my services, my email is: [email protected]
I am a tech writer at ditii.com.
My passion lies in helping users recover their emails and understand the nuances of email creation and management. I strive to produce content that is both educational and user-friendly, ensuring readers can easily follow and implement my advice.
I enhance the visibility and reach of our content, providing effective solutions for common email issues.