Outlook is similar to any email client. It uses a cache to boost performance and enable offline access. Over time, this cache may become corrupted or bloated. It can lead to slow performance, syncing problems, and even crashes. Clearing the Outlook cache often resolves these issues. It’s a simple fix that can restore optimal functionality.
Understanding Outlook Cache
Before diving into steps, know what the Outlook cache is. It’s a local copy of your emails, contacts, and calendar data. You store this data on your computer. It can not only enhance performance but can also cause problems if corrupted.
When to Clear the Outlook Cache?
If Outlook crawls, syncs poorly, data is corrupted, or crashes often, clearing the cache might help. Over time, this cache can become corrupted or outdated. By deleting it, you force Outlook to rebuild from scratch, improving both performance and stability.

How to Clear the Outlook Cache?
Before you start, backup your Outlook data to avoid accidental loss.
Method 1: Deleting the RoamCache Folder
- Make sure Outlook is completely closed. Press the Windows key + R to open the Run box.
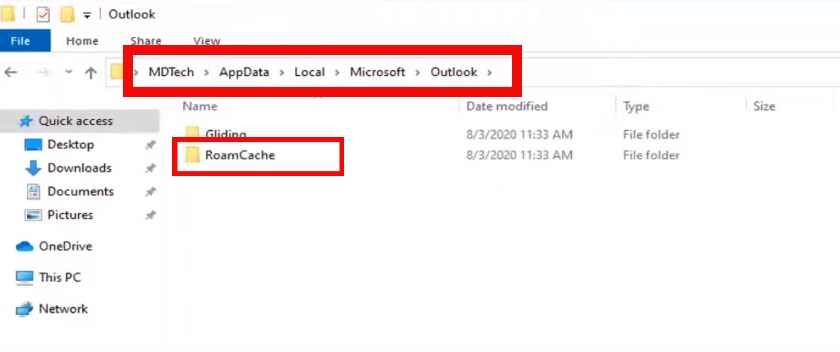
- Navigate to the RoamCache folder. Type “%localappdata%\Microsoft\Outlook\RoamCache” in the Run dialog and press Enter.
- Select all files in the RoamCache folder and double click on them to open it. Press Ctrl + A to delete them. To ensure the files are gone for good, clear “Recycle Bin”.
Method 2: Deleting the OST File
Deleting the OST file removes your offline copy of emails and data. You must reconnect your account to download everything again.
- Close Outlook. Ensure Outlook is not running. Go to File > Account Settings > Data Files tab to find it.
- Remove the OST file for the account you want to clear the cache for.
Method 3: Using Outlook’s Built-in Tools (Outlook 2013 and later)
- Open Outlook. Start the application. Go to File > Account Settings. Pick the account you want to clear the cache for.
- Click the “Open File Location” button. Shut down Outlook.
- Find the OST file and other cache files, then delete them.

Additional Tips
Clear auto-complete suggestions by going to File > Options > Mail > Empty Auto-Complete List.
Fix search issues by rebuilding the Outlook search index via File > Options > Search > Indexing Options > Rebuild. Sometimes, creating a new Outlook profile helps resolve persistent issues.
Precautions
Backup your Outlook data before clearing the cache to avoid data loss. Deleting the OST file removes your offline email copy. Test Outlook’s performance after clearing the cache to ensure the issue is resolved.

Hello! I’m George Charles Walls, a dedicated writer at ditii.com specializing in technology and email recovery.
- With extensive knowledge in email creation and management, I provide readers with practical tips and solutions for their email-related issues.
- My aim is to make email technology accessible and straightforward for everyone, ensuring our content is both engaging and informative.
My focus on creating clear, step-by-step instructions and helps users efficiently manage their email accounts.

