
A professional email signature is a critical digital feature. It gives recipients your contact info instantly. This establishes legitimacy and makes it easier for you to stay connected. Job changes or phone updates make keeping your signature updated essential. Use this guide to change your signature in Outlook for Windows and Outlook Web App.
Changing your Signature in Outlook for Windows
If you use Outlook on your desktop, modify your signature by following the steps given below:
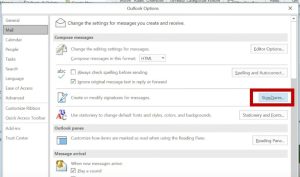
- Accessing Signature Settings: Open the Outlook application. Click the “File” tab from the top-left corner. Under “Options,” choose “Mail” from the left-hand menu. Head down to the “Signatures” section. Select “Edit signature.”
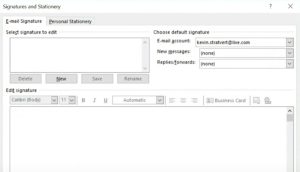
- Editing Your Signature: A “Signatures and Stationery” window appears on screen. Select the signature to edit from the “Select signature to edit” dropdown. The current signature content will be displayed in the editing box below.
- Making Changes: Modify your signature in the editing box. You can use formatting options like bold, italics, and different fonts. Add data like your name, job title, company info, phone number, website address, and social media links.
- Specifying When to Use the Signature: In the “Signatures and Stationery” window, set when your edited signature gets inserted into emails. Use radio buttons under “Choose default signature” to set it for new messages, replies, and forwards.
- Saving Your Changes: After editing your signature and setting usage preferences, click on “OK.” This saves the changes you made, and your updated signature will be applied based on your selections.
Changing your Signature in Outlook Web App
For web-based email users, updating your signature in Outlook Web App is straightforward. Follow these steps:
- Accessing Settings: Logging into your Outlook Web App account is the first step. Once you’re in, click the gear icon in the top-right corner. Select “View all Outlook settings” from the dropdown menu.
- Navigating to Signature Settings: Next, in the “Settings” menu, click “Mail” in the sidebar. Under the “Compose and reply” section, find the “Signature” option.
- Editing Your Signature: A text box will appear under “Signature.” This box shows your current signature. Edit the text directly, updating your contact info or modifying the format.
- Saving Your Changes: After editing, scroll to the bottom. Click the “Save” button. Your updated signature will apply to all future emails sent through Outlook Web App.
By following these steps, you easily keep your email signature in Outlook updated. This ensures your recipients have access to your most current contact information. A professional signature is a small detail but can help in making a big impression.

Greetings! I’m Chester Metts, a tech-savvy writer and specialist at ditii.com. My expertise lies in technology and email recovery, where I focus on creating detailed guides and articles that help users recover lost emails and manage their inbox efficiently.
With a strong background in email creation, I ensure users can navigate their email platforms with ease. I am proficient in optimizing content to enhance visibility and user engagement, making sure our readers find exactly what they need.
Thanks for reading me!