
Outlook, a commonly used email client, tends to get cluttered over time due to accumulating emails. However, over time, the platform slows down, making it tough to find specific emails. To solve this, archiving moves older emails to separate storage, not deleting them.
This guide explores different methods to archive emails in Outlook. Let’s dive into this in-depth guide.
Understanding the Need for Archiving
Before diving into archiving, grasp why it’s crucial. A cluttered Outlook slows down the system. But archiving reduces primary folder emails, boosting performance. Finding specific emails among thousands can be time-consuming. Archiving organizes emails, simplifying searches. Archiving frees up space on your primary storage device. Archived emails remain accessible, ensuring important information isn’t lost.
Methods of Archiving Emails in Outlook
Outlook offers multiple ways to archive emails, each with its own advantages.
- Manual Archiving
Want granular control over your email archiving? Here’s how to do it manually:
- Select Emails: Pick the emails you intend to archive.
- Archive Option: Choose “Archive” from the toolbar.
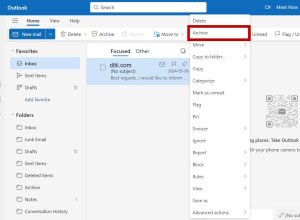
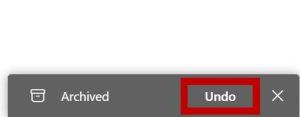
- Confirm: You will get a pop-up notification confirming your action and giving you the option to “Undo”.
- AutoArchive
AutoArchive automates the archiving process, moving older emails to an archive folder based on predefined criteria.
Auto Archive Outlook 365 – 2010
Want to start archiving immediately? Click Yes. Need to review or change options first? Click AutoArchive Settings. Don’t want to bother now? Click No and set it up later by following these steps:
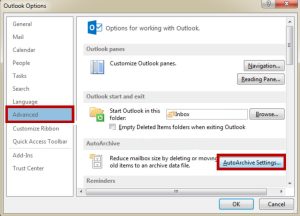
- Open Outlook and click File > Options > Advanced. Under AutoArchive, click on the AutoArchive Settings.
- In the AutoArchive dialog window, everything looks grayed out. Check the “Run AutoArchive every N days” box to activate other options. Specify how to AutoArchive often.
- Choose any other options you prefer, such as having Outlook delete old items rather than archiving them.
While archiving, status information appears in the status bar. Once complete, the Archive folder will show in Outlook, provided you’ve selected “Show archive folder in the folder list.”
Auto Archive Outlook 2007
In Outlook 2007, auto archiving is by default enabled for specific folders:
- Calendar, Task, and Journal Items: Archiving items older than 6 months.
- Sent Items and Deleted Items Folders: Archiving items older than 2 months.
For other folders, like Inbox, Drafts, and Notes, you can enable AutoArchive manually:
- In the Folder List, right-click the folder you would like to AutoArchive. Then choose “Properties”. Select the “AutoArchive” tab. To set the AutoArchive properties for the folder, select to choose “Clean out items older than”.
- Type a number in the “Months” box to specify the items that must be automatically transferred to the archive file. Choose “Move old items to” to specify a file for the archived items you want to transfer.
- In the “Move old items to” box, type the file name for the items you have archived. Or choose “Browse” to select from a list. Then choose “OK”.
- Using the Clean Up Tools
Outlook’s built-in ‘Clean Up Tools’ offer options to archive or delete old items.
- Access Clean Up Tools: Go to “File” -> “Info” -> “Clean Up Tools.”
- Choose the appropriate tool: Select “Archive” to manually archive items or “Clean Up Old Items” to delete or archive based on age.
Additional Tips
Create virtual folders in Outlook to display emails from both your Inbox and archive folders. Fine-tune AutoArchive settings to meet your specific needs. Consider using specialized archiving software for advanced features and customization.
By effectively archiving emails, you enhance Outlook’s performance and improve organization. Protect your valuable data by choosing the archiving method that suits you best. Establish a consistent routine to maintain a well-managed email environment.

Greetings! I’m Chester Metts, a tech-savvy writer and specialist at ditii.com. My expertise lies in technology and email recovery, where I focus on creating detailed guides and articles that help users recover lost emails and manage their inbox efficiently.
With a strong background in email creation, I ensure users can navigate their email platforms with ease. I am proficient in optimizing content to enhance visibility and user engagement, making sure our readers find exactly what they need.
Thanks for reading me!