
Emojis now flood our digital conversations, bringing personality and emotion to messages. Of course, Outlook, a massively popular email client, couldn’t miss the emoji train. Let me walk you through different ways to sprinkle emojis into your Outlook emails.
Method 1: Using the Windows Emoji Picker
Applicable to: Windows users leveraging Outlook for Microsoft 365, Outlook 2019, or Outlook 2016, here’s your guide.
- Fire up Outlook, compose a new email, or dive into an existing draft.
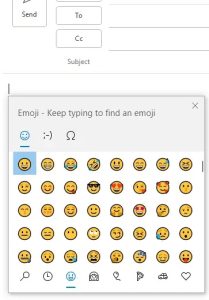
- Want to add emojis, hit the Windows key plus period (.). The emoji picker will appear.
- Browse emojis, categories, or search specifically. Found the emoji you were looking for? Click to insert into the email.
Method 2: Inserting Emojis via the Insert Tab
Applicable to: Outlook for Microsoft 365, Outlook 2019, and Outlook 2016 have unique methods to insert emojis.
- Begin with the “Insert” tab. Locate and click it in the Outlook ribbon. To find Symbols, first click “Symbol,” then choose “More Symbols.”
- For proper emoji font, pick “Segoe UI Emoji” from the font dropdown. Yes, select the emoji subset. Choose “Extended Characters – Plane 1” from the subset dropdown.
- To finalize, find your emoji, select it, then click “Insert.”
Method 3: Using Keyboard Shortcuts (Limited Emojis)
Applicable to: Outlook for Microsoft 365, Outlook 2019, and Outlook 2016.
Outlook supports a limited set of basic emojis through keyboard shortcuts. Here are some common examples:
- 🙂 – Smiling face
- 🙁 – Frowning face
- 🙂 – Smiling face with open mouth
- 🙁 – Frowning face with open mouth
- 😉 – Winking face
- ;-( – Crying face
Remember that the availability of these shortcuts might vary depending on your Outlook version and settings.
Method 4: Employing the AutoCorrect Feature (Custom Shortcuts)
Applicable to: Outlook for Microsoft 365, Outlook 2019, and Outlook 2016.
- Access the Symbols dialog box. Mimic steps 2-4 from Method 2 for opening the Symbols dialog box. Activate AutoCorrect. Press the “AutoCorrect” button located at the bottom left.
- Create a custom shortcut. Enter your desired shortcut in the “Replace” field (e.g., :smile:). The corresponding emoji will appear in the “With” field. Save the shortcut. Hit “Add” and then “OK” to confirm changes.
Later, type the shortcut in your email, and the associated emoji will magically appear.
Additional Tips
Emojis can spice things up, but keep in mind, not all email clients play nice with them. Some recipients might see cryptic symbols instead. Sprinkle emojis like salt. Too much, and your email might look less professional. On a Mac or mobile device, inserting emojis might require different steps. Check the specific platform’s documentation for exact guidance.
By following these methods and tips, you can effectively incorporate emojis into your Outlook emails, adding a personal touch and making your messages more engaging.

Hi there! I’m John R. Steadman, if you want my services, my email is: [email protected]
I am a tech writer at ditii.com.
My passion lies in helping users recover their emails and understand the nuances of email creation and management. I strive to produce content that is both educational and user-friendly, ensuring readers can easily follow and implement my advice.
I enhance the visibility and reach of our content, providing effective solutions for common email issues.