Before sending emails, knowing the basics of Xfinity email is crucial.
- Access: Log in to your Xfinity email via the Xfinity website (connect.xfinity.com). Email clients such as Outlook, Thunderbird, or Apple Mail can also be used.
- Features: Compose, send, receive, reply, forward, and delete emails using Xfinity email. Extra features include spam filtering, address book management, and organizational tools for emails.
Sending an Email Using the Xfinity Website
To send an email using the Xfinity website, follow these steps: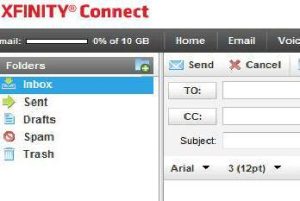
- Visit connect.xfinity.com. Log in with your Xfinity ID and password. After login, find the “Email” section at the top right corner. Hit the “Compose” button to start a new message.
- Fill in the details
- To: Type the recipient’s email address.
- Cc: Add extra recipients to receive a copy of the email.
- Bcc: Add recipients who get the email copy secretly.
- Subject: Write a short and clear subject line.
- Draft your email in the main body. Format text, add attachments, or insert images as needed. Press the “Send” button to dispatch your email.
Sending an Email Using an Email Client
If you choose to use an email client, follow these steps:
- Configure your email client with your Xfinity email address. Use the incoming mail server (imap.comcast.net). Set the outgoing mail server to (smtp.comcast.net). Apply the necessary security settings. Check your email client’s documentation for detailed setup instructions. Open your email client. Click the “Compose” button to start writing your email.
- Enter the recipient’s email address. Write the subject. Add the message content as previously described. Click the “Send” button to transmit the email.
Troubleshooting Common Issues
If you having issues while sending your email, do the following.
- Email Not Sending
- Check internet connection. You might have to reboot your router. Verify recipient’s email address. Double-check for typos.
- Ensure sufficient disk space. Review email client settings. Correct server configuration is crucial.
- Email Not Received
- Confirm recipient’s email address. Check spam filters. Your email might be chilling in the spam folder.
- Verify recipient’s storage space. They might need to delete some old emails.
Additional Tips
Craft clear and concise subject lines to boost email organization. Always proofread emails before sending to dodge errors. For messages you send often, consider using email templates. Utilize features like scheduling, snoozing, and labels to manage your inbox efficiently.

Hi there! I’m John R. Steadman, if you want my services, my email is: [email protected]
I am a tech writer at ditii.com.
My passion lies in helping users recover their emails and understand the nuances of email creation and management. I strive to produce content that is both educational and user-friendly, ensuring readers can easily follow and implement my advice.
I enhance the visibility and reach of our content, providing effective solutions for common email issues.